Audio-Subtitle Manager for DVDLab Studio
DVDLab Studio introduced the ability to control a second audio and single subtitle stream inside a reasonably priced program based on the DVDLab Pro code. However, the menu interface presented limitations that require a bit of careful work in order to present the viewer with a "classic" setup menu where they can turn the subtitles on or off and choose between the two audio streams and then go back to the main menu.
This tutorial is based on the current Audio-Subtitle Manager for DVDLab Pro. Additional (and invaluable) help were provided on the MMBForum by Lou and Vapymid
Getting Started
We will create a total of 12 menus for our audio-subtitle manager. Our viewer will navigate around and select items to move a check marks before going back to the main menu to view the movie or select a particular scene. Because we will be using auto-activating buttons and "go to next menu" settings, it is vital that the menus be created in the correct order.
Make the "complete" menu
Start renaming "Menu 1" to "Main Menu" to keep things simple and add a new menu (automatically called "Menu 2") that includes all of the items we will need for all the following screens. This includes all four check mark indicators visible at the same time. We will remove the uneccesary ones on each subsequent menu later. We need to do this so that placement errors don't cause items to "jump" as we navigate later.

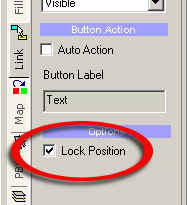
It is also a good idea to set the "lock position" flag on each item.
Now we are going to create group hotspots so that a our viewer uses a cursor to highlight to navigate around the screen. Draw a small rectangle under each option (don't forget one under "main menu"). Don't worry about the color... it won't matter in a minute.
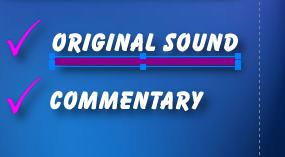
Now go back to each rectangle and set the "Button Visibility" option on the "link" tab to "Invisible Normal" for EACH rectangle. When you are done, your menu should look like this.

We are almost done creating our template. The final step is to add selection HotSpots. Select the HotSpot tool and carefully draw a selection around "Original Sound" and the line under it. Do not include the check mark in the box.
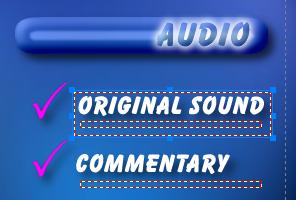
Create hotspots around the rest in the following order so that the auto navigation works correctly.
Commentary
On
Off
Main Menu
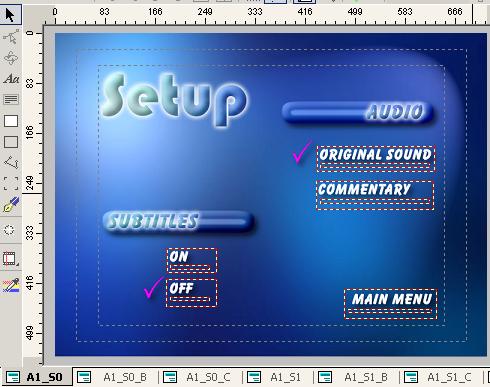
When you are done, your template menu should look like this.

Create the eleven other menus
We will need a total of twelve menus to make our system work. In DVDLab Pro, we could have used the "clone" tool but we don't have that option in Studio. Instead, we are going to go to the drop-down menus and choose "Menu" "Add" "Add Duplicate"

We are going to do this ELEVEN times until we have twelve audio-subtitle menus (13 total menus if you include our Main Menu)

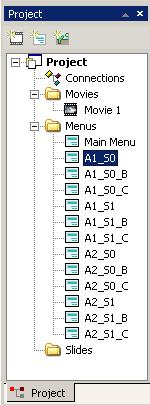
To make thing easier, go rename all of the menus as follows:
Old Name New Name Menu 2 A1_S0 Menu 3 A1_S0_B Menu 4 A1_S0_C Menu 5 A1_S1 Menu 6 A1_S1_B Menu 7 A1_S1_C Menu 8 A2_S0 Menu 9 A2_S0_B Menu 10 A2_S0_C Menu 11 A2_S1 Menu 12 A2_S1_B Menu 13 A2_S1_C
Note: Those are "ONES" and "ZEROS" after the "A" and "S". The "A" stands for "Audio stream" and the 1 or 2 tells us which one to set. The "S" stands for "Subtitle" and "0" means "off" while "1" means "on."
Your final menu structure MUST look like this for everything to work later.
Cleaning-up and linking the four main selection menus
Since we know that "A1" stands for "audio stream 1" and "S0" stands for "subtitles off" we can now go back and remove the extra check marks from our "A1_S0" menu.
Make sure you are working with the correct menu and then delete the check from in front of "Commentary" and "On" so that you get a menu that looks like this.
Now, go to the following menus and delete the following checks
Menu REMOVE checks before A1_S1 "Commentary" and "Off" A2_S0 "Original Sound" and "On" A2_S1 "Original Sound" and "Off"
Next, we will link the menus together. These links will NOT actually set the audio and subtitle flags. Instead, they will present the proposed configuration that will be set when the viewer asks to return to the main menu. It is OK that some links will point right back to the same menu. Also, we are not setting the link for the Main Menu button yet. Go to the A1_S0 menu and set the following (make sure you do them in the order listed so they flow correctly):
HotSpot Links to Original Sound A1_S0 Commentary A2_S0 On A1_S1 Off A1_S0
Go to the A1_S1 menu and set the following in the following order:
HotSpot Links to Original Sound A1_S1 Commentary A2_S1 On A1_S1 Off A1_S0
Go to the A2_S0 menu and set the following in the following order:
HotSpot Links to Original Sound A1_S0 Commentary A2_S0 On A2_S1 Off A2_S0
Go to the A2_S1 menu and set the following in the following order:
HotSpot Links to Original Sound A1_S1 Commentary A2_S1 On A2_S1 Off A2_S0
At this point it would be a good idea to turn on the menu simulator (make sure you have also turned on "follow links") and try out all of the audio and subtitle options on your menus.
Setting the audio and starting the fall-through.
Sadly, we can't set the audio or subtitle flags and direct a HotSpot to another menu. Therefore, we are going to use a trick that causes the selection to "fall-through" to the next menu. This is why it is absolutely important that we created the menus in a specific order.
When the viewer has the check marks where they want them, they will select the "Main Menu" HotSpot. We will use that to set the audio.
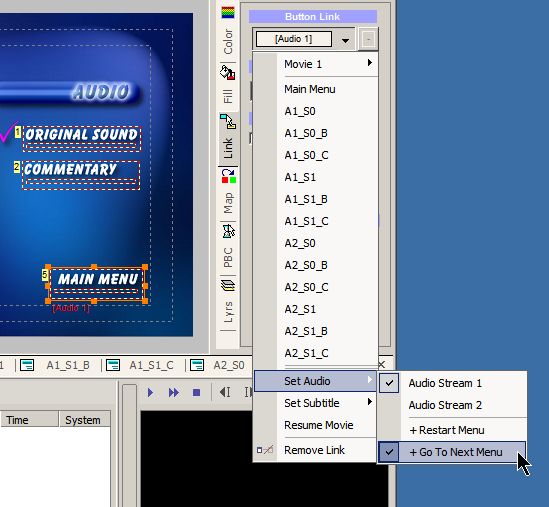
Go to the A1_S0 menu and select the "Main Menu" HotSpot. Go to the lower end of the link list and choose the "Set Audio" option, select "Audio Stream 1" and then select "Go to Next Menu" like this.
Go to the A1_S1 menu. Set its "Main Menu" HotSpot exactly the same ("Audio Stream 1" and "Go to Next Menu").
Go to the A2_S0 menu. Set its "Main Menu" HotSpot to "Audio Stream 2" and select "Go to Next Menu"
Finally, go to the A2_S1 menu. Set its "Main Menu" HotSpot to "Audio Stream 2" and select "Go to Next Menu"
Preparing the "_B" and "_C" menus
Before we do the final steps, we need to clean off the "_B" and "_C" menus. These menus will catch the program as it falls away from the other menus, set the subtitle flags, and return to the Main Menu.
Go to the A1_S0_B menu and delete EVERYTHING except for the word "Setup" It will look like this when you are done.

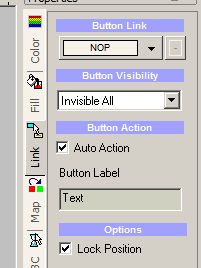
Select "Setup" and turn on "Auto Action" and change the Button Visibility to "Invisible All"
Unfortunately, we have to pause on these screens for one second before moving on. Create a text object that says something like "Please Wait... Setting options" Use the "center horizontaly" and "Center Vertically" buttons then copy it so you can paste it to the other "_B" and "C" menus. Then, go to the PBC tab and set the Duration to "1" and set "Force Activate Btn" to "1" like this.

Do the exact same things to all of the other "_B" and "_C" menus. Don't forget to paste in your "Please Wait" text.
Setting the subtitles
We will use the "auto action" link on the "_B" menus to set the subtitle. Go to the A1_S0_B menu and select the invisible "Setup" link. Go to the lower end of the link list and choose the "Set Subtitle" option, select "Subtitle OFF" and then select "Go to Next Menu" like this.

Go to the A2_S0_B menu. Set its "Setup" link exactly the same ("Subtitle OFF" and "Go to Next Menu").
Go to the A1_S1_B menu. Set its "Setup" link to "Subtitle Stream 1" and select "Go to Next Menu"
Finally, go to the A2_S1_B menu. Set its "Setup" link to "Subtitle Stream 1" and select "Go to Next Menu"
Final Step -- Returning to the Main Menu
Now that we have set the audio and subtitles, we need to catch the falling menus and send them back to the main menu. We've already set our "_C" menus to auto activate their single button when the "_B" menus fall-through to them. We just need to tell them all to go back to the Main Menu. Go to the A1_S0_C menu and select the invisible "Setup" link. Go to the "Button Link" and set it to the "Main Menu" like this.

Go to each of the A2_S1_C, A2_S0_C, and A2_S1_C menus and set each of their invisible "Setup" links to "Main Menu."
Congratulations
You are finished. Make sure you put some kind of "Setup Audio/Subtitles" button on your main menu and link it to the A1_S0 menu. And, of course, add your movie and maybe some scene selection menus and .... Well, you get the picture
Note: in order to fully test this you will need to compile your project and either burn it to DVD or use a software player. The Menu Simulation system in DVDLab Studio will NOT follow the "fall through" links we've created.